




An SSL certificate is a digital credential that authenticates your website’s identity and encrypts data between your server and visitors. When you configure SSL certificates for websites, you activate HTTPS, the protocol browsers use to signal a secure connection. Certificate Authorities such as Let’s Encrypt issue these credentials after verifying domain ownership. The HSTS standard then enforces HTTPS at the browser level, locking in that security long term. Getting this right protects user data, builds trust, and directly supports your search engine rankings.
What do you need before configuring SSL certificates?
Preparation prevents most SSL failures. Before you install SSL certificates, confirm three things: your domain’s DNS records point correctly to your server, the right ports are open, and you have chosen a certificate type.
Your DNS A record must resolve to your server’s IP address. If you are using a subdomain, a CNAME record pointing to the correct host is also required. Incorrect DNS is the most common reason certificate issuance fails, because the Certificate Authority cannot verify you control the domain.

Ports 80 and 443 must both be open on your server’s firewall. Port 80 handles the HTTP challenge that Let’s Encrypt uses to verify your domain. Port 443 carries all encrypted HTTPS traffic once the certificate is active. Blocking either port stops the process cold.
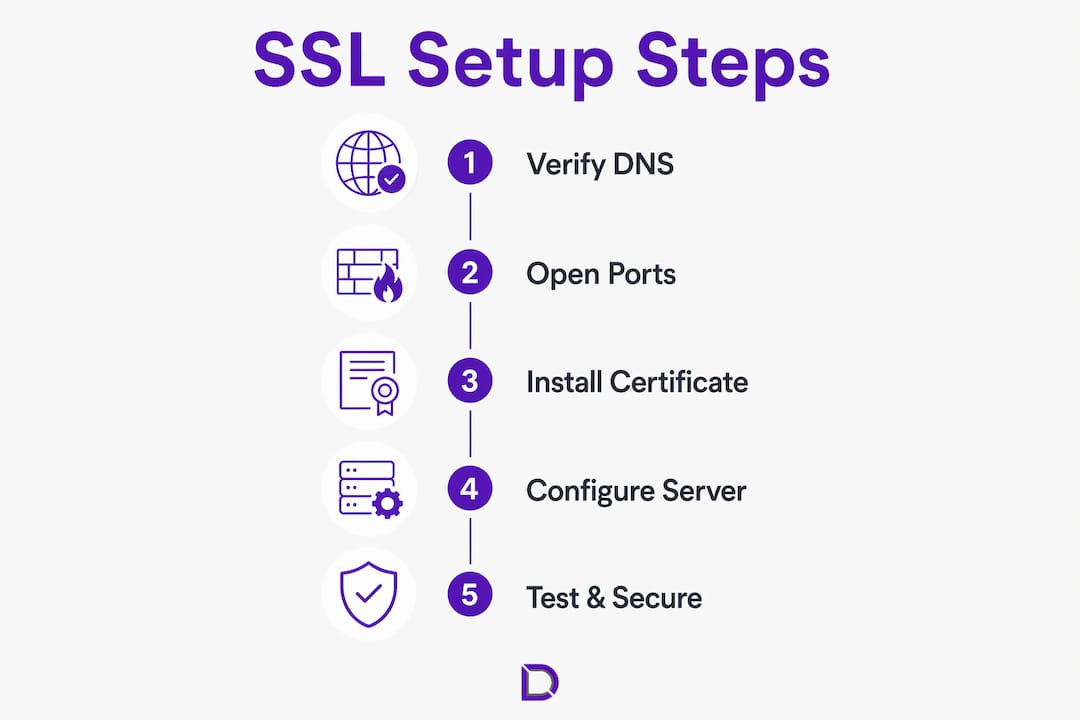
For most websites, Let’s Encrypt is the right certificate choice. It is free, widely trusted, and renews automatically every 90 days to prevent outages. Paid certificates from commercial providers make sense when you need extended validation (EV) or organisation validation (OV) for compliance or enterprise trust requirements.
| Prerequisite | Tool or standard | Purpose |
|---|---|---|
| Domain DNS records | A record or CNAME | Proves domain ownership to the Certificate Authority |
| Open firewall ports | Ports 80 and 443 | Allows certificate challenge and HTTPS traffic |
| Certificate issuance tool | Certbot | Automates Let’s Encrypt certificate requests and renewals |
| Web server access | Nginx or Apache | Required to apply certificate files and update configuration |
| Certificate type decision | Let’s Encrypt (free) or paid CA | Determines validation level and cost |
Pro Tip: Check your server’s firewall rules before running any certificate command. A blocked port 80 will cause the ACME challenge to fail silently, and you will spend time debugging the wrong problem.
How do you install and configure SSL on Nginx and Apache?
Certbot is the standard tool for this task. It auto-configures Nginx and Apache for SSL with a single command, handles HTTP to HTTPS redirection, and sets up automatic renewal. Manual installation is an option for custom server setups, but Certbot removes most of the risk.
Installing with Certbot on Nginx
- Install Certbot and the Nginx plugin on Ubuntu:
sudo apt install certbot python3-certbot-nginx - Run the certificate command:
sudo certbot --nginx -d yourdomain.com.au -d www.yourdomain.com.au - Certbot will ask whether to redirect HTTP traffic to HTTPS. Select the redirect option.
- Certbot writes the SSL configuration into your Nginx server block automatically.
- Verify the configuration with:
sudo nginx -tthen reload withsudo systemctl reload nginx
Installing with Certbot on Apache
- Install Certbot and the Apache plugin:
sudo apt install certbot python3-certbot-apache - Run:
sudo certbot --apache -d yourdomain.com.au -d www.yourdomain.com.au - Certbot modifies your Apache virtual host to enable SSL and adds a redirect from port 80 to port 443.
- Test the configuration:
sudo apachectl configtestthen reload withsudo systemctl reload apache2
Manual SSL configuration for custom setups
Advanced server configurations sometimes require manual referencing of certificate files rather than relying on automated tools. In that case, your Nginx server block for port 443 needs these directives:
ssl_certificate /etc/letsencrypt/live/yourdomain.com.au/fullchain.pem;
ssl_certificate_key /etc/letsencrypt/live/yourdomain.com.au/privkey.pem;
ssl_protocols TLSv1.2 TLSv1.3;
ssl_ciphers HIGH:!aNULL:!MD5;
For Apache, the equivalent virtual host uses SSLCertificateFile, SSLCertificateKeyFile, and SSLCertificateChainFile directives pointing to the same Let’s Encrypt paths.
Always force HTTP to HTTPS redirection. For Nginx, add a server block on port 80 that returns a 301 redirect to the HTTPS version. For Apache, add Redirect permanent / https://yourdomain.com.au/ inside the port 80 virtual host. Only enable this redirect after you have confirmed the SSL certificate loads correctly. Forcing HTTPS before the certificate works will take your site offline.
Pro Tip: After installation, visit your site at https://yourdomain.com.au and check the padlock in the browser address bar. Then run an SSL test using SSL Labs’ free server test tool to confirm your cipher suites and protocol versions meet current standards.
How do you enable HSTS and other security headers?
HSTS (HTTP Strict Transport Security) tells browsers to use HTTPS for every future visit, even if a user types http:// manually. It prevents protocol downgrade attacks and cookie hijacking. You should only enable it after your HTTPS setup is stable and tested.
The standard HSTS configuration uses a max-age of 31,536,000 seconds, which equals one year. Once a browser caches this header, it will refuse to load your site over plain HTTP for that entire period. That is why stability before activation matters so much.
For Nginx, add this line inside your port 443 server block:
add_header Strict-Transport-Security "max-age=31536000; includeSubDomains" always;
For Apache, add this inside your SSL virtual host:
Header always set Strict-Transport-Security "max-age=31536000; includeSubDomains"
Beyond HSTS, these additional headers strengthen your site’s security posture:
X-Content-Type-Options: nosniffprevents browsers from guessing file typesX-Frame-Options: SAMEORIGINblocks your site from being embedded in iframes on other domainsReferrer-Policy: strict-origin-when-cross-originlimits referrer data sent to third partiesContent-Security-Policyrestricts which scripts and resources can load on your pages
The includeSubDomains directive extends HSTS to all subdomains. The preload directive submits your domain to browser HSTS preload lists, which means browsers enforce HTTPS before ever visiting your site. Apply preload only when you are certain every subdomain runs HTTPS correctly. Reversing a preload submission takes months.
Pro Tip: Test your HSTS header using securityheaders.com before going live. It shows exactly which headers are present, which are missing, and flags any misconfiguration.
What are the most common SSL configuration mistakes?
Most SSL problems fall into three categories: mixed content errors, expired certificates, and self-signed certificates on public sites.
Mixed content errors occur when a page loads over HTTPS but still references images, scripts, or stylesheets via HTTP links. Mixed content warnings appear even when your SSL certificate is valid and correctly installed. The fix requires updating hard-coded HTTP links in your CMS settings, theme files, and database. WordPress sites commonly store the site URL as http:// in the database. Updating this in Settings > General, and running a search-and-replace on the database, resolves most cases.
Mixed content is the single most common reason a padlock icon fails to appear after SSL installation. A valid certificate does not guarantee a clean HTTPS page if any resource on that page loads over HTTP.
Expired certificates cause immediate browser warnings that block visitors from reaching your site. Let’s Encrypt certificates expire every 90 days, so automatic renewal is not optional. Certbot installs a cron job or systemd timer to handle this, but you should verify it works. Run sudo certbot renew --dry-run regularly to simulate renewal without making changes. If the dry run fails, you have time to fix the problem before the certificate actually expires.
Self-signed certificates are not trusted by browsers and trigger security warnings that damage user trust and harm your SEO. They are appropriate only for internal testing environments, never for public-facing websites. If your hosting environment issued a self-signed certificate by default, replace it with a Let’s Encrypt or paid CA certificate before launching.
Common troubleshooting steps when SSL is not working:
- Confirm DNS has fully propagated using a tool like
digor an online DNS checker - Check that ports 80 and 443 are open with
sudo ufw statusor your hosting control panel’s firewall settings - Review the Certbot log at
/var/log/letsencrypt/letsencrypt.logfor specific error messages - Confirm the certificate files exist at the expected paths before referencing them in server config
- Check for website security fundamentals if you suspect broader configuration issues beyond SSL
Cheap hosting plans sometimes block port 80 or restrict SSL automation. If you encounter persistent issuance failures, your hosting environment may be the root cause rather than your configuration.
Key takeaways
Configuring SSL certificates correctly requires verified DNS records, open ports, a trusted Certificate Authority, and ongoing renewal discipline to keep your site secure and trusted by browsers.
| Point | Details |
|---|---|
| DNS and ports first | Confirm A records and open ports 80 and 443 before running any certificate command. |
| Use Certbot for automation | Certbot handles issuance, server configuration, and renewal for Nginx and Apache automatically. |
| Enable HSTS after testing | Apply the HSTS header only once HTTPS is confirmed stable to avoid locking out visitors. |
| Fix mixed content actively | Update all HTTP links in your CMS and database after enabling SSL to clear browser warnings. |
| Test renewal regularly | Run certbot renew --dry-run to catch renewal failures before your certificate expires. |
SSL configuration: what I’ve learned the hard way
The step most developers skip is the mixed content audit. You install the certificate, the padlock appears, and you move on. Then a client calls two weeks later because their checkout page is showing a security warning. Nine times out of ten, a plugin or theme is still loading a stylesheet or tracking pixel over HTTP. Updating web applications and CMS settings to use HTTPS URLs is an often overlooked but critical step after enabling SSL, and it deserves its own checklist item, not an afterthought.
The second thing I see go wrong is HSTS applied too early. Developers read that HSTS improves security, which it does, and they add it before they have confirmed every subdomain runs HTTPS. Then a subdomain that was never meant to be public becomes unreachable for a year. The includeSubDomains directive is powerful. Use it deliberately.
Automated renewal through Certbot is genuinely reliable, but “reliable” does not mean “set and forget.” I recommend scheduling a monthly check of your renewal logs. A firewall rule change, a hosting migration, or a port block can silently break the renewal process. You will not know until the certificate expires and visitors start seeing warnings. The --dry-run flag exists precisely for this reason. Use it.
The broader point is that SSL configuration is not a one-time task. It is an ongoing maintenance discipline. The sites that stay secure are the ones where someone is watching the renewal logs, auditing the headers, and updating the CMS settings when plugins change. That discipline is what separates a secure site from one that just looks secure.
— James
SSL and domain management made easier with Com
Getting SSL right starts with having your domain and hosting in order. Com offers domain management and web hosting built for Australian businesses, with local support that understands the full picture from DNS configuration through to certificate issuance.
When your hosting environment supports SSL automation and your domain records are correctly managed in one place, the entire configuration process becomes far less error-prone. Com’s team can help you get the foundations right so tools like Certbot work as intended from the first run. If you are setting up a new site or migrating an existing one, having reliable hosting that does not block the ports SSL needs is the difference between a smooth setup and hours of troubleshooting.
FAQ
What is an SSL certificate and why does a website need one?
An SSL certificate is a digital credential issued by a Certificate Authority that authenticates your website and enables encrypted HTTPS connections. Browsers mark sites without SSL as “Not Secure,” which damages user trust and search engine rankings.
How do I configure SSL certificates on websites for free?
Let’s Encrypt provides free SSL certificates through Certbot, which automatically installs and configures SSL on Nginx and Apache servers. Certificates renew every 90 days automatically when Certbot’s renewal timer is active.
What causes a padlock not to appear after SSL installation?
Mixed content errors are the most common cause. Even with a valid certificate, browsers will not show a padlock if any page resource loads over HTTP. Update all internal links and CMS settings to HTTPS to resolve this.
How long does an SSL certificate last?
Let’s Encrypt certificates are valid for 90 days. Paid certificates from commercial providers typically last one to two years. Automatic renewal through Certbot prevents expiry-related outages for Let’s Encrypt certificates.
Is it safe to use a self-signed SSL certificate on a public website?
Self-signed certificates are not trusted by browsers and trigger security warnings that block visitors and harm SEO. Use them only for internal testing, never on a public-facing site.
Leave a Reply