

Managing hosting account permissions is the process of assigning and controlling user roles and access rights to protect your website and hosting resources. For website administrators and small business owners, getting this right is the difference between a secure operation and a costly breach. Platforms like cPanel, Cloudflare, and the Elements Hosting Reactor Panel each offer distinct permission frameworks, and understanding how they work together gives you precise control over who can see, edit, or delete your files and settings. This guide walks you through every layer of that control.
How to manage hosting account permissions effectively
Hosting account permissions define what each user can do within your hosting environment. They sit across two distinct layers: file system permissions, which control read, write, and execute access on individual files and folders, and account user roles, which govern what areas of the hosting panel a person can access. Confusing these two layers is one of the most common mistakes administrators make, and it leads to either over-exposure or unnecessary lockouts.
The standard industry term for this discipline is access control management, and it covers both layers. The phrase “managing hosting account permissions” maps directly to this practice. Knowing both terms helps when you are searching documentation or raising a support ticket.
Assigning specific permissions per user is safer than sharing account passwords or granting full control to everyone who needs occasional access. The least privilege principle, which means giving each user only the minimum access required for their role, is the recognised best practice across every major hosting platform.

What are hosting account user roles and permission levels?
Most hosting platforms organise access into a small set of named roles. Understanding what each role can do prevents you from accidentally handing a developer the keys to your billing settings.
Common roles across platforms include:
- Super admin. Full access to all account settings, billing, user management, and files. Reserve this for the account owner and one trusted backup contact only.
- Collaborator. Limited access scoped to specific websites or projects. Elements Hosting Reactor Panel uses this model, where collaborators only see the websites you explicitly assign to them.
- Read-only. Can view settings and files but cannot make changes. Useful for auditors, clients reviewing progress, or junior team members learning the system.
- Write. Can modify files or settings within a defined scope but cannot add or remove users.
File permissions operate separately, using the Unix numeric system. The value 755 means the owner can read, write, and execute, while group members and public visitors can only read and execute. The value 644 restricts write access to the owner alone, which is the correct setting for most website files. cPanel’s File Manager lets you change these values through a visual interface without touching the command line, which makes it accessible for non-technical administrators.
Pro Tip: Never set file permissions to 777 on a live website. This grants read, write, and execute access to everyone, including malicious scripts. If a plugin or setup guide tells you to use 777, treat it as a red flag.
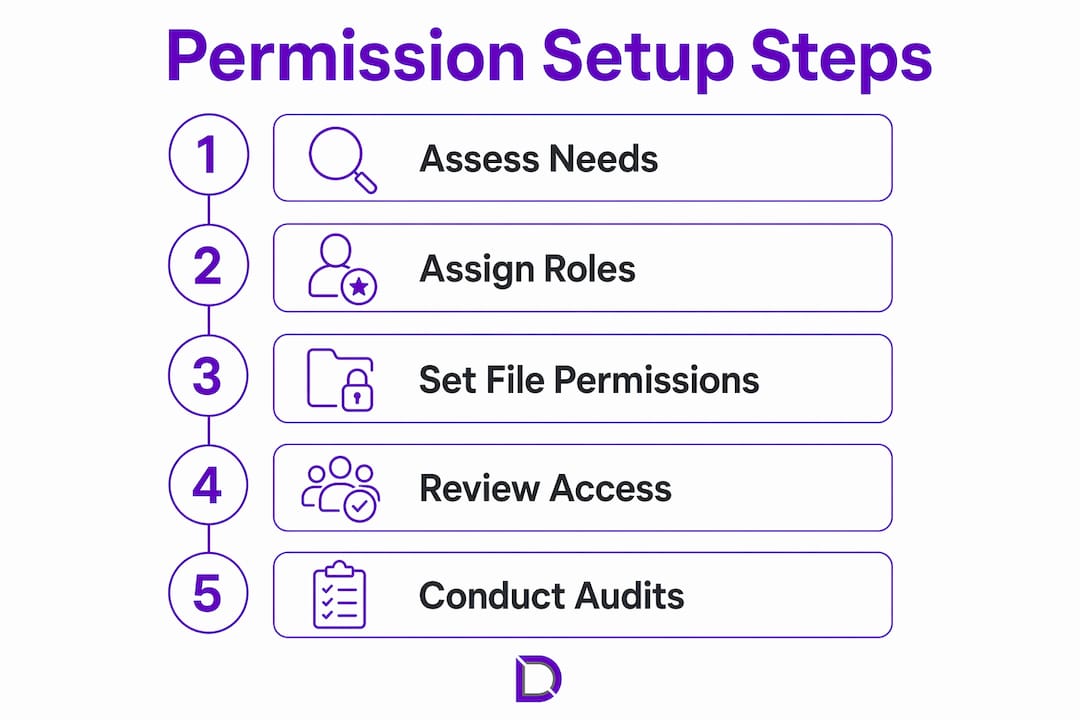
How to set up and manage user access in your hosting panel
The setup process varies slightly between platforms, but the underlying logic is consistent. Follow these steps to configure permissions correctly from the start.
- Audit your current users. Log in to your hosting panel and list every account that has access. Remove any users who no longer need it. Former employees, old contractors, and test accounts are the most common sources of unnecessary exposure.
- Define roles before you invite anyone. Decide in advance whether a new user needs super admin, collaborator, or read-only access. Write it down. This prevents the habit of defaulting to full access because it is quicker.
- Invite users through the panel, not by sharing passwords. In cPanel, use the Manage My Account or User Manager section to create sub-accounts. In the Elements Hosting Reactor Panel, navigate to Users and select Add Collaborator, then specify which websites they can access.
- Configure file permissions for new deployments. After uploading files via FTP or File Manager, set directories to 755 and files to 644. For WordPress sites, the wp-config.php file should be set to 440 or 400 to prevent public reads.
- Apply Cloudflare granular permissions where relevant. If you use Cloudflare Tunnels or Mesh nodes, granular resource-scoped permissions let you grant a read-only role on a single Tunnel without giving that user account-wide control. This is a significant security improvement over broad role assignments.
- Document every permission change. Keep a simple log with the date, the user, the role assigned, and the reason. This takes two minutes and saves hours during audits.
The table below summarises recommended permission settings for common hosting scenarios.
| Scenario | Recommended role | File permission |
|---|---|---|
| Business owner (account holder) | Super admin | N/A (full access) |
| Web developer building a site | Collaborator (site-specific) | 755 directories, 644 files |
| Content editor updating pages | Collaborator (write, content only) | 644 files |
| Client reviewing a staging site | Read-only collaborator | No file access needed |
| External auditor checking security | Read-only | 440 for sensitive config files |
Pro Tip: When onboarding a new developer, create a collaborator account scoped to their project only. If they later work on a second site, add that site to their existing account rather than upgrading them to super admin.
Common mistakes and troubleshooting permission issues
Permission errors fall into two categories: too much access granted, and too little. Both cause real problems.
Over-permissioning is the more dangerous of the two. When a user has broader access than their role requires, a compromised account exposes far more of your hosting environment than necessary. Newer hosting platforms increasingly emphasise limiting permissions to the minimal necessary, precisely because over-permissioning has been the root cause of so many account compromises.
The second common mistake is conflating file system permissions with account user roles. A developer might have collaborator access in your hosting panel but still be blocked from uploading files if the FTP directory permissions are set incorrectly. These are separate systems and need to be checked independently when diagnosing access problems.
When a user reports they cannot access a file or folder, work through this checklist:
- Confirm their account role in the hosting panel matches what they need.
- Check the numeric file permission on the specific file or directory using File Manager or an FTP client like FileZilla.
- Verify the file ownership. If a file is owned by a different system user, permission values alone will not resolve the issue.
- If the problem appeared after a platform update or migration, use your host’s permission reset tool. Resetting file permissions via cPanel restores original ownership and access settings, which is the fastest way to recover from a botched migration.
Treat any access denial report as a security signal, not just a technical inconvenience. If a user suddenly cannot access something they previously could, check your access logs before assuming it is a configuration error. Unauthorised permission changes are a known indicator of account compromise.
Review your user list and permission settings at least every three months. Quarterly audits catch stale accounts before they become vulnerabilities.
How fine-grained permission controls improve hosting security
The traditional model of hosting permissions offered two speeds: full access or no access. That binary approach created a practical problem. Administrators either gave developers more access than necessary or blocked them from doing their jobs. Fine-grained permission models solve this by scoping access to specific resources rather than entire accounts.
Cloudflare’s May 2026 update to its permission system is the clearest recent example of this shift. Cloudflare’s granular permissions allow administrators to delegate access to specific Tunnel instances or Mesh nodes without granting account-wide control. A team member managing one tunnel gets exactly that access and nothing more.
The table below compares the traditional broad-role model with the granular resource-scoped approach.
| Attribute | Broad account-level role | Granular resource-scoped permission |
|---|---|---|
| Scope | Entire account | Specific tunnel, node, or site |
| Risk if compromised | High (full account exposure) | Low (single resource exposure) |
| Setup complexity | Low | Moderate |
| Suitable for | Account owners, senior admins | Contractors, developers, external teams |
| Legacy automation compatibility | Full | Additive, does not break existing roles |
The additive nature of Cloudflare’s model is worth highlighting. Access is granted if the principal holds either the broad account-level role or a granular resource-scoped permission. This means you can introduce fine-grained controls without rewriting your existing automation or breaking integrations that rely on legacy role assignments.
For small businesses, the practical impact is significant. A freelance developer working on one client project no longer needs visibility into your entire hosting account. A support contractor troubleshooting a single tunnel does not need access to your DNS records or billing details. Scoped permissions make collaboration safer without adding friction to day-to-day operations.
Key takeaways
Effective hosting account access management requires separating file system permissions from user roles, applying the least privilege principle, and auditing access regularly to prevent over-permissioning.
| Point | Details |
|---|---|
| Separate the two permission layers | File system permissions and account user roles are distinct systems that must be managed independently. |
| Apply least privilege from the start | Assign collaborator or read-only roles by default and upgrade access only when genuinely needed. |
| Use granular permissions for contractors | Cloudflare’s resource-scoped model limits exposure to a single tunnel or node, not the whole account. |
| Audit user lists every quarter | Remove stale accounts and review role assignments to catch unnecessary access before it becomes a risk. |
| Enable 2FA on all user accounts | Two-factor authentication adds a critical layer of protection against unauthorised access, even when credentials are compromised. |
Why I think most small businesses get permissions backwards
After years of working with website administrators and small business owners, I have noticed a consistent pattern. Permissions get set up once during the initial build, usually in a hurry, and then never reviewed again. The developer who built the site still has super admin access two years later. The old marketing agency still has FTP credentials. Nobody removed them because nobody thought to check.
The uncomfortable truth is that most hosting account compromises are not the result of sophisticated attacks. They come from stale credentials and over-permissioned accounts that were never cleaned up. The least privilege principle is not a complex security concept. It is just the habit of asking “does this person actually need this level of access?” before you grant it.
My practical advice: set a recurring calendar reminder every three months to open your hosting panel and review the user list. It takes ten minutes. Pair that with enabling 2FA on every account, including your own. The combination of scoped roles and two-factor authentication covers the vast majority of real-world access risks without requiring any specialist security knowledge.
For agencies managing multiple client sites, the white-label hosting model makes permission delegation much cleaner. You can assign client-specific collaborator access without exposing your master account credentials. That separation is worth building into your workflow from day one.
— James
Secure your site with the right hosting setup
Getting permissions right starts with choosing a hosting platform that makes access control straightforward. Com, the Australian-based domain and website solutions provider, offers web hosting plans built with secure user access and permission management in mind. Whether you are setting up collaborator roles for a development team or locking down file permissions on a live business site, the right hosting environment makes the process far less painful. The benefits of managed hosting include having access controls configured and maintained as part of the service, so you are not managing security alone. Reach out to the Com team for personalised guidance on setting up your hosting account the right way.
FAQ
What is the difference between file permissions and user roles?
File permissions control read, write, and execute access on individual files and directories using numeric values like 755 or 644. User roles control what sections of the hosting panel a person can access, such as billing, DNS settings, or specific websites.
How do I restrict hosting account access for a contractor?
Create a collaborator account scoped to the specific site or resource they need, rather than sharing your main login credentials. Platforms like the Elements Hosting Reactor Panel and Cloudflare both support this model natively.
What does the least privilege principle mean in hosting?
The least privilege principle means giving each user only the minimum access required to do their job. This limits the damage if an account is compromised, because the attacker can only reach what that user could reach.
How often should I audit my hosting account permissions?
Review your user list and role assignments at least every three months. Remove accounts belonging to former staff or contractors immediately when their engagement ends, rather than waiting for a scheduled review.
Does enabling 2FA replace the need for proper permission settings?
No. Two-factor authentication protects against unauthorised login attempts but does not limit what an authenticated user can do. Proper role assignments and file permissions remain necessary alongside 2FA for complete access control.
Leave a Reply